Machine operators


Effect of machine on blade life


Take advantage of all the ways to achieve a longer service life for your band saw blades. This brings huge savings potential, not only in simple cost per cut, but also in administrative and operational savings through less frequent replacements. There are some things we can't control on the band saw machine side, but we need to be aware of the limitations. For others, however, we can offer some tips for improvement.

Only a few things on a band saw machine can affect the life of the band saw blades as much as the guides. We recommend that they are regularly checked for functionality and precise adjustment. This is the only way to achieve both a precise cut and a long tool life.


  • If possible, remove the entire segment (guide cube) from the machine and adjust on the workbench.
  • Check the condition of the carbides (side and upper pressure plates) and the smooth functioning of the bearings.
  • Adjust the guides to the new belt. It is ideal to have a reference piece cut in the workshop.
  • Adjust the carbides so that there is a gap of 0.02-0.05 mm between the band saw blade and the guides.
  • Attach the guide bearings (rollers) to the straightened blade. From the bearings must be in line with the carbides.
  • Put the segment back on the machine, but do not make the final attachment. Leave it positioned a little higher.
  • Put the band saw blade on, let it run through to settle on the impellers.
  • Make the final segment settings. Leave a 1 mm gap between the blade and the cube. Tighten.


Notice:

This procedure is not valid for all types of band saw machines. It can be applied to most scissor type machines and some horizontal machines. The specific procedure is always given in the machine manual.

On some machines, especially the simpler ones, one of two impellers is not firmly fixed on the shaft. The machine operator must then make regular adjustments to ensure that the band saw blade is in the correct position and does not fall or touch the flange of the impeller. If the band saw blade runs into the flange, not only is the band damaged, but over time the impeller itself is damaged.


  • Before removing the old blade, check its position on the impellers.
  • If this is not possible, fit a new blade, tighten it and allow it to run freely.
  • Check the position of the blade, where there should be a gap of 1-2 mm between the back and the flange.
  • If the gap is larger or the blade is touching the flange, loosen the blade and adjust the tilt of the wheel.
  • There is usually an Allen screw on the outside of the saw arm for this purpose.
  • Tighten the blade, let it run through and check. Repeat until the blade is in the right place.


Notice:
This procedure is not valid for all types of band saw machines. The specific procedure is always given in the machine manual.

When selecting or using a band saw blade, it is also a good idea to take into account the design limitations on the blade side. The higher the quality of the material to be cut, the more likely they are to be respected. For optimum performance and durability of band saw blades, the impellers should have a minimum diameter, the machine should provide enough space for the blade to twist and, especially in solid materials, the band saw blade should not be overloaded with too long cuts.


Width x thicknessImpellersTwisting the bladeCutted material
units v mmmin. diameter in mmmax. per 100 mmmax. diameter in mm
13 x 0,6529023°50
20 x 0,9041020°100
27 x 0,9041020°150
34 x 1,1050017°250
41 x 1,3059014°400
54 x 1,3059014°600
54 x 1,6073011°900
67 x 1,6073011°1300
80 x 1,6073011°2000

The appearance and shape of the chips is one of the easiest ways to evaluate the correctness of the set cutting parameters. The basic parameter is the tooth gap capacity (gullet area), especially for smaller pitches in variable toothing.


  • The loose curl on the left is the correct result.
  • Heavy and heavily turned chip indicates that either the tooth pitch or cutting parameters are not properly selected. Such a chip puts excessive stress on the band saw blade and can cause damage.


By reading the chips, the correctness of the cutting parameters can be quickly evaluated

Thick, heavy or blue chips

  • too high pressure for short cutting times
  • high feed into the cut relative to the blade speed
  • insufficient cooling, poor concentration

Loosely curled chips

  • correct cutting values
  • adjust parameters slightly with more curled chips
  • or check the suitability of the tooth pitch

Thin or powdery chips

  • increase the feed into the cut or slow down the blade speed
  • use larger tooth pitch for stringy and curled chips

Examples of material clamping


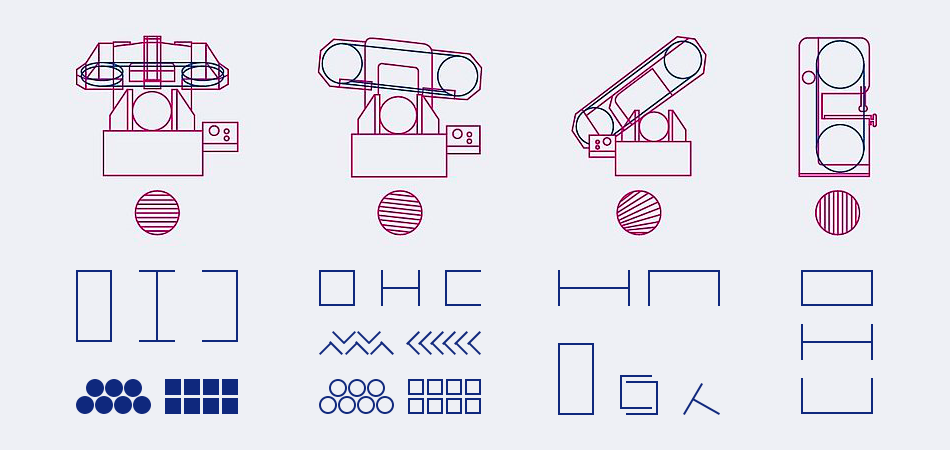
The figure shows only some examples of possible material clamping in the machine. Always ensure that the material is firmly clamped so that there is no vibration in any part of the cut, or rolling in the case of round shapes. For hollow or flat materials, if the situation permits, it is always advantageous to shorten the contact length of the cut by standing upright.


Material bundle cutting is only possible if the machine is equipped with an upper pressure vise. If the machine does not have automatic hydraulic feeding, it is advisable to clamp or weld the ends of the material. However, always keep the machine switched off when welding.


  • Horizontal machine - ideal for cutting solid materials of all grades, not very suitable for cutting square profiles.
  • Horizontal machine with inclined frame - ideal for cutting profiles of all shapes and sizes.
  • Swing arm machine - universal use, limited possibilities of cutting materials with high tensile strength.
  • Vertical machine - mostly small manual cutting or special automatic systems.